

Amazon RDS is a managed relational database service that lets you easily deploy, scale, and replicate databases. You can…

Andre Newman
Technical Writer

Gremlin is a simple, safe and secure service for performing Chaos Engineering experiments through a SaaS-based platform. This tutorial will walk through how to install Gremlin on Amazon’s Managed Kubernetes Service (EKS) with a demo environment and perform a Chaos Engineering experiment using a Gremlin Shutdown attack.
Before you begin this tutorial, you’ll need the following:
This tutorial will walk you through the required steps to run an EKS cluster, deploy two applications and then run a Chaos Engineering experiment using Gremlin.
In this step, you’ll first verify that you have your AWS CLI configured to use eksctl to create the EKS cluster:
1aws --version
This should give you an output similar to:
1aws-cli/1.16.150 Python/3.7.3 Darwin/18.5.0 botocore/1.12.140
If you’re having issues, refer back to the AWS CLI Installation documentation.
For this tutorial, we are going to use Weave Work’s open source tool, eksctl, to create our EKS clusters. On your local machine, install eksctl:
1curl --silent --location "https://github.com/weaveworks/eksctl/releases/download/latest\_release/eksctl\_$(uname -s)_amd64.tar.gz" | tar xz -C /tmp sudo mv /tmp/eksctl /usr/local/bin
After installing eksctl, create a basic cluster:
1eksctl create cluster
This will create a cluster and the needed resources in us-west-2. It will auto-generate a cluster name, create 2 m5.large ec2 instances using the official AWS EKS AMI, and set up a dedicated VPC.
Verify that the eks cluster has been set up properly:
1eksctl get clusters
The output should display the name of your cluster and the region similar to:
1NAME REGION23gremlin-eks fabulous-mushroom-1527688624
You can now grab the kubeconfig file from AWS using the AWS CLI and passing the cluster name and region:
1sudo aws eks --region us-west-2 update-kubeconfig --name fabulous-mushroom-1527688624
To averify the hosts that eksctl has setup for us, run:
1kubectl get nodes
Step 3.1 - Retrieve Your Team ID and Secret Key
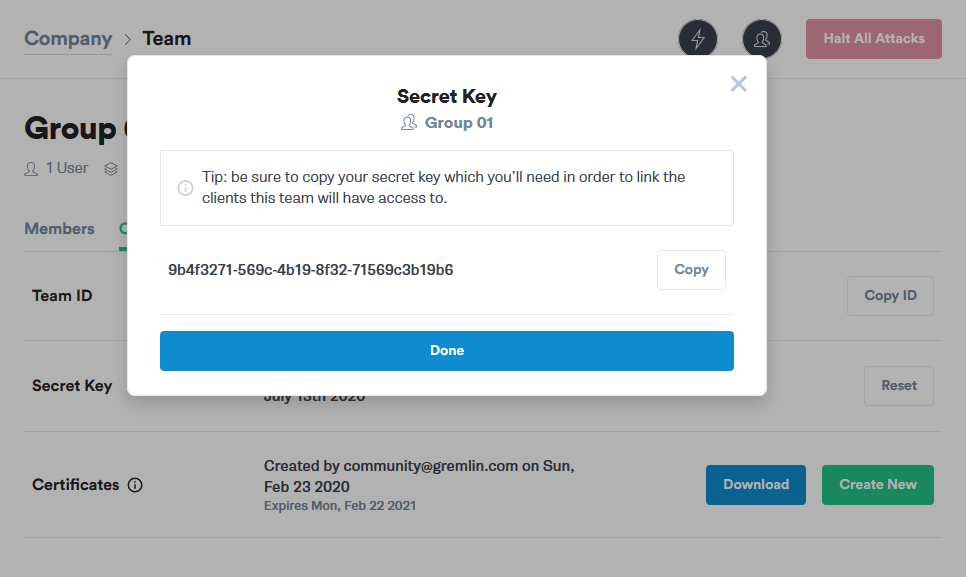
To install the Gremlin Kubernetes client, you will need your Gremlin Team ID and Secret Key. If you already know what those are, you can skip to step 3.2. If you don’t know what your Team ID and Secret Key are, you can get them from the Gremlin web app.
Visit the Teams page in Gremlin, and then click on your team’s name in the list.

On the Teams screen click on Configuration.

Make a note of your Team ID.
If you don’t know your Secret Key, you will need to reset it. Click the Reset button. You’ll get a popup reminding you that any running clients using the current Secret Key will need to be configured with the new key. Hit Continue.
Next you’ll see a popup screen that will show you the new Secret Key. Make a note of it.
Step 3.2 - Install the Gremlin Client with Helm
The simplest way to install the Gremlin client on your Kubernetes cluster is to use Helm. If you do not already have Helm installed, go here to get started. Once Helm is installed and configured, the next steps are to add the Gremlin repo and install the client.
Add the Gremlin Helm chart:
1helm repo add gremlin https://helm.gremlin.com
Create a namespace for the Gremlin Kubernetes client:
1kubectl create namespace gremlin
Next you will run the helm command to install the Gremlin client. In this command there are three placeholder variables that you will need to replace with real data. Replace $GREMLIN_TEAM_ID with your Team ID from step1, and replace $GREMLIN_TEAM_SECRET with your Secret Key from step 1. Replace $GREMLIN_CLUSTER_ID with a name for the cluster.
If you are using Helm v3, run this command:
1helm install gremlin gremlin/gremlin \2 --namespace gremlin \3 --set gremlin.secret.managed=true \4 --set gremlin.secret.type=secret \5 --set gremlin.secret.teamID=$GREMLIN_TEAM_ID \6 --set gremlin.secret.clusterID=$GREMLIN_CLUSTER_ID \7 --set gremlin.secret.teamSecret=$GREMLIN_TEAM_SECRET
For older versions of Helm, use the --name option:
1helm install gremlin/gremlin \2 --name gremlin \3 --namespace gremlin \4 --set gremlin.secret.managed=true \5 --set gremlin.secret.type=secret \6 --set gremlin.secret.teamID=$GREMLIN_TEAM_ID \7 --set gremlin.secret.clusterID=$GREMLIN_CLUSTER_ID \8 --set gremlin.secret.teamSecret=$GREMLIN_TEAM_SECRET
If you’re not sure which version of Helm you’re using, run this command:
1helm version
To verify that the installation was successful, run this command:
1kubectl get pods -n gremlin
The output should show one chao pod and one gremlin pod for each node in your cluster. These should all be in the Running state:
1NAME READY STATUS RESTARTS AGE2chao-78bbc7cbf6-9hn7q 1/1 Running 0 5d20h3gremlin-9r4t7 1/1 Running 0 5d20h4gremlin-bwmtz 1/1 Running 0 5d20h5gremlin-bx6dn 1/1 Running 0 5d20h
For more information on the Gremlin Helm chart, including more configuration options, check out the chart on Github.
The Gremlin client is also available to be installed using kubectl. For more information on how to use this method, check out the instructions here.
The demo environment we are going to deploy on to our EKS cluster is the Hipster Shop: Cloud-Native Microservices Demo Application
On your local machine clone the repo:
1git clone https://github.com/GoogleCloudPlatform/microservices-demo.git
Then, change directories to the directory we have just created:
1cd microservices-demo
To deploy the application:
1kubectl apply -f ./release/kubernetes-manifests.yaml
Wait until pods are in a ready state. To check the readiness run:
1kubectl get pods
Grab the ip address the frontend lives on:
1kubectl get svc frontend-external -o wide
The output is the URL you’ll visit using your web browser and it looks like this:
A7718c2117c2d11e98240024d0758e34-2062095095.us-west-2.elb.amazonaws.com
Visit the URL on your browser

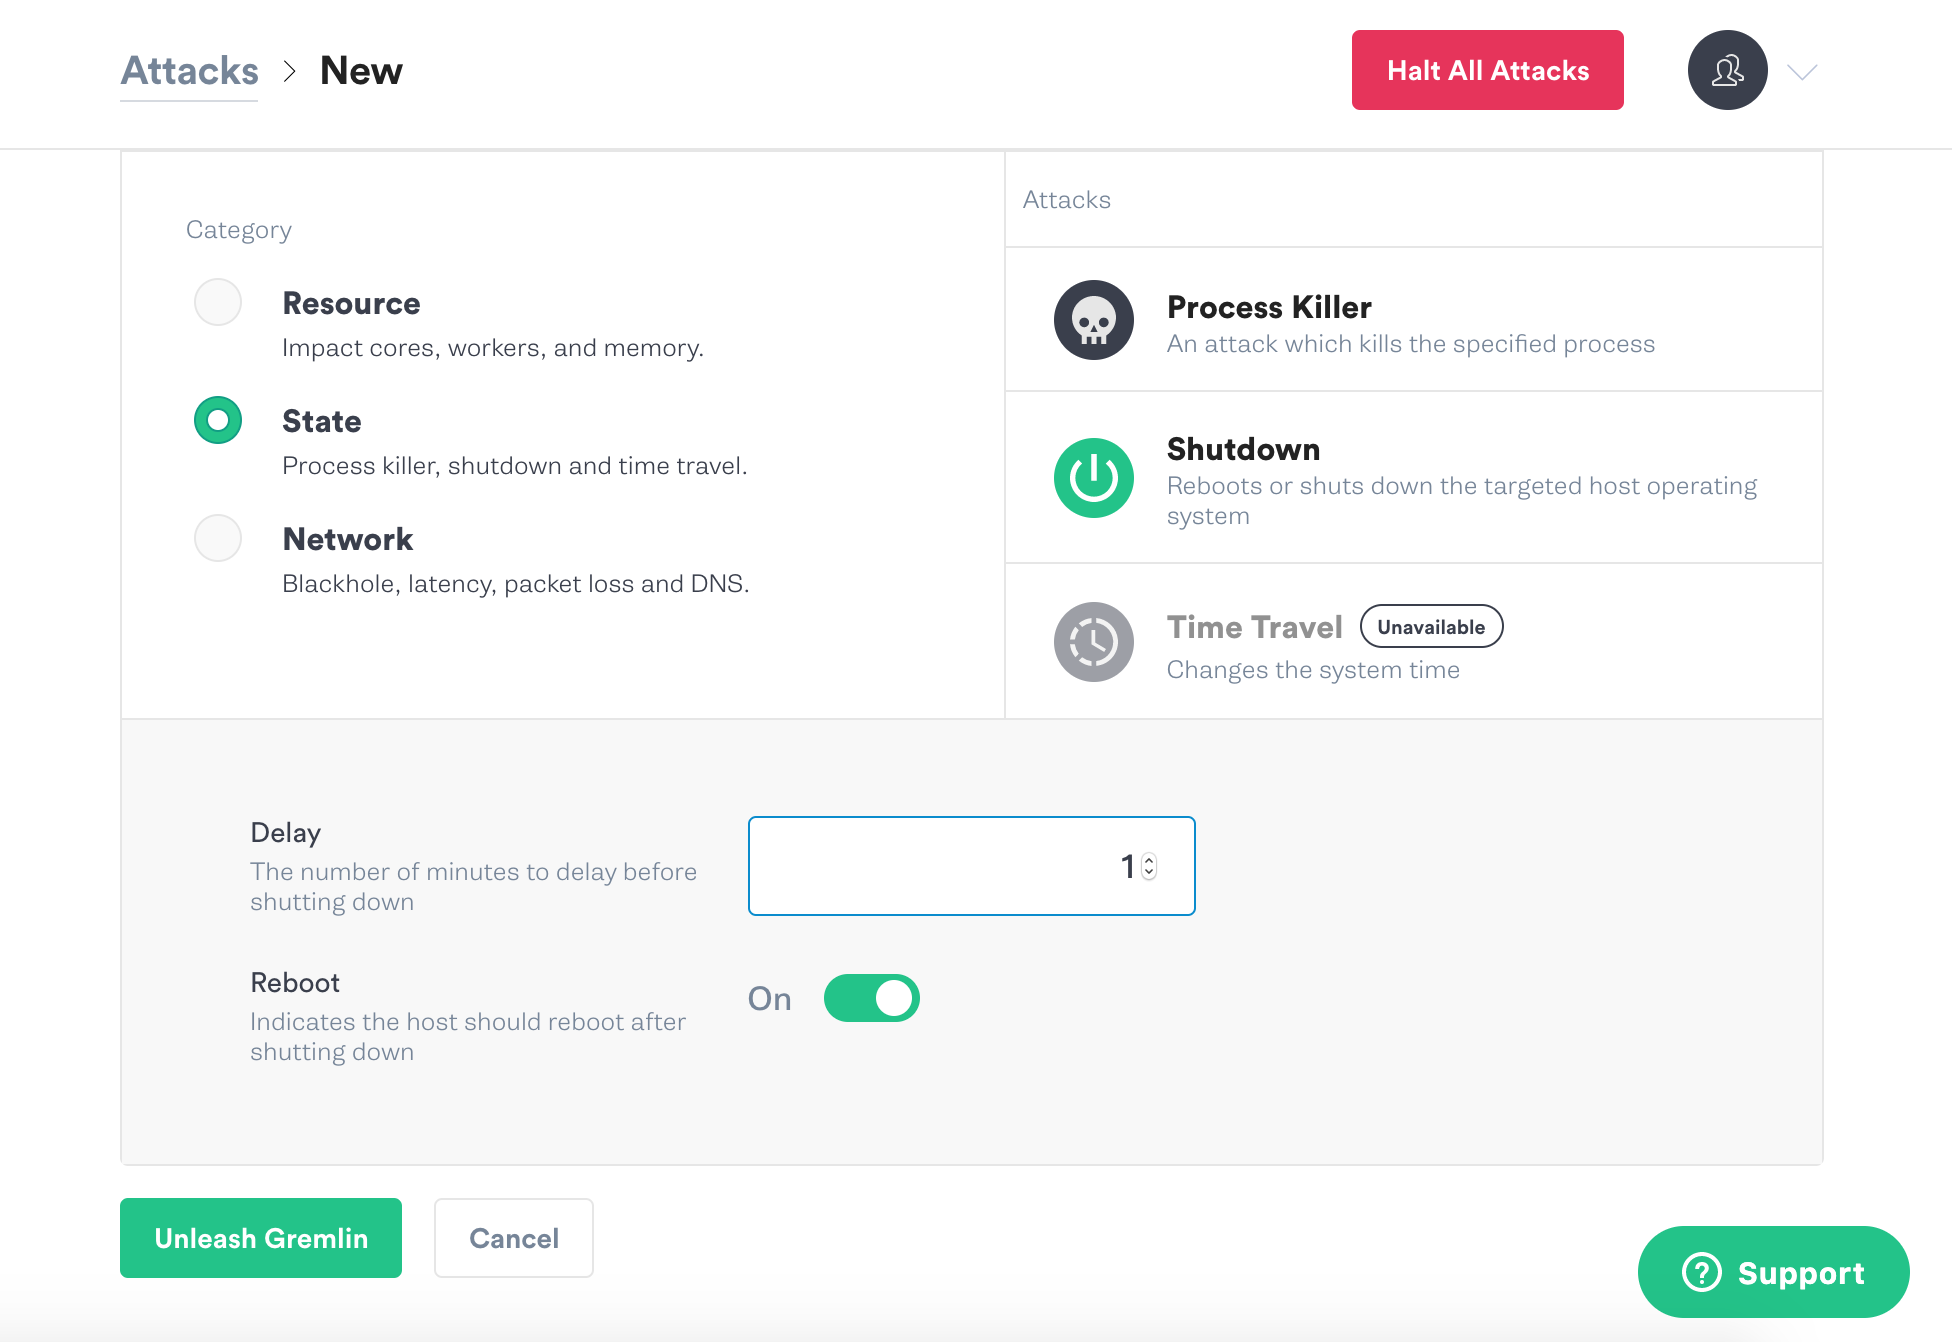
We are going to create our first Chaos Engineering experiment. We want to validate EKS reliability. Our hypothesis is, “When shutting down my cart service container, I will not suffer downtime and EKS will give me a new one.”
Going back to the Gremlin UI, select Attacks from the menu on the left and press the green “New Attack” button. We’re going to target a Kubernetes resource, so click Kubernetes in the upper right.

We will be shutting down the “cartservice” containers. Gremlin has imported the objects from Kubernetes and we can see them in the UI. We can find the container we want to target by expanding the Deployments field and selecting cartservice.

We will now go over to choosing the gremlin. We will be a doing a state Chaos Engineering Attack, so select “State” and choose “Shutdown” from the options. We will leave the delay set to 1 minute and turn off the reboot. Then click on the green Unleash Gremlin button.
You can view the state of the pods with kubetctl:
1kubectl get pods
Also, make sure to check out the demo app to test user experience to see if your hypothesis is correct.
Our hypothesis was, "When shutting down my cart service container, I will not suffer downtime and EKS will give me a new one."
We didn't prove this to be correct. We actually saw that the Hipster Shop: Cloud-Native Microservices Demo Application demo did not gracefully handle shutdown. It instead threw a 500 internal server error. To mitigate this issue we would need to first investigate why we saw the error and look into the logs. For example, we can see the error "could not retrieve cart". When we run kubectl get pods we will see there is only one cartservice running and it has no redundancy.
When we view cartservice.yaml we see that cart service uses redis but it does not use clustered redis: https://github.com/GoogleCloudPlatform/microservices-demo/blob/master/kubernetes-manifests/cartservice.yaml

Congrats! You’ve set up an AWS EKS cluster, deployed the Kubernetes Dashboard, deployed a microservice demo application, installed the Gremlin agent with the Gremlin Helm chart, and ran your first Chaos Engineering attack to validate Kubernetes reliability! If you have any questions at all or are wondering what else you can do with this demo environment, feel free to DM me in the Chaos Slack: @anamedina (join here!).

Gremlin empowers you to proactively root out failure before it causes downtime. See how you can harness chaos to build resilient systems by requesting a demo of Gremlin.
Get started